Hashicorp nomad
Nomad Architecture
在工作中,因為早期因素及特殊需求,因此部分服務離不開Windows作業系統。
又先前透過pm2托管平台上的各種服務,其服務包含了Python, Java及Nodejs,但托管起來除了Nodejs之外,Python偶不時會出狀況。
Nomad是Hashicorp公司出品,先前使用過同家公司出品的Vault作為敏感性資訊的存放,體驗極佳,團隊決定嘗試把pm2上的服務轉移至Nomad上,並且測試其穩定性。
首先,先簡單介紹Nomad架構
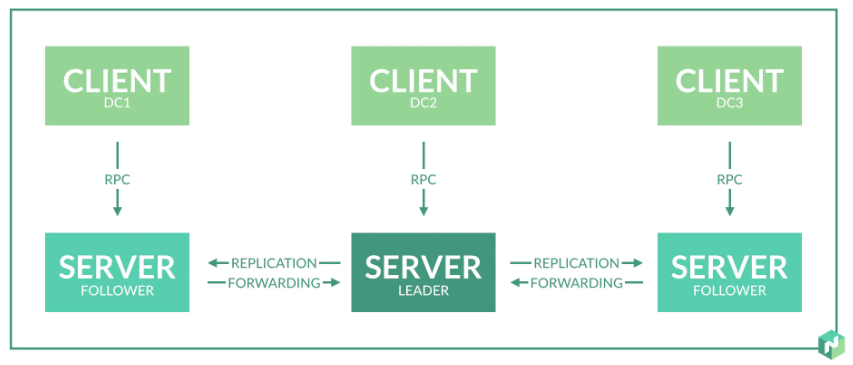
Nomad架構包含了Server端及Client端,很類似Kubernetens的Control Plane及Node的主從架構。
Nomad配置時,會需要三個port,分別是http、rpc、serf,功能如下:
- http: 提供給使用者的使用介面,包含nomad cli、Web UI介面。
- rpc: Server與Client彼此溝通之介面
- serf: Server與Server彼此溝通之介面
本次測試將Server與Client端在同一台Host上測試。官方不建議將Server與Client配置在同一台機器上用於生產環境中。
環境準備
- Windows Server 2019
- nomad.exe
配置及啟動Nomad
Nomad啟動與Vault相同,以Binary執行方式啟動。
- Windows環境: 可以透過sc.exe或nssm將Nomad安裝成Windows Service。
- Linux環境: 可以透過systemd托管成服務。
Server Config
配置參數可參考官網: https://www.nomadproject.io/docs/configuration#general-parameters
生成一個server.hcl文件
1 | datacenter = "<dc_name>" |
- datacenter: 設定datacenter名稱,預設為”dc1”。
- name: 設定nomad server名稱,預設為”hostname”。
- data_dir: 用來儲存nomad放資料的地方。
- bind_addr: 提供外部連線之ip,例如: Web UI、HTTP等,預設為”0.0.0.0”
(設定127.0.0.1會出現fail,原因此IP亦是提供其他nomad server溝通作為HA使用) - server
- enabled = true (代表啟動server mod)
- bootstrap_expect : N (預計要啟動幾個Server,所為三台Nomad server做HA,則設定為3,HA的做法要參考官網或其他)
- ports
- 可分別指定http, rpc, serf的port
- advertise (這邊沒有設定)
- 可分別指定http, rpc, serf的ip: port
- log_level : 預設是INFO。有”TRACE”、”DEBUG”、”INFO”、”WARN”、”ERR”可以選擇。
- log_file :
(檔名會是nomad-{timestamp}.log) - log_rotate_duration: log紀錄多久時間rotate一次。
以command line方式nomad server
1 | nomad.exe agent -config="C:\nomad\conf\server.hcl" |
Client Config
生成一個client.hcl文件
1 | datacenter = "<dc_name>" |
- client
- servers : 輸入
:<server的rpc port> (對應於server端的rpc port)
- servers : 輸入
- advertise
- 這邊是指client的對外公告url+ip 跟server的advertise不同
- ports
- 這邊是指client的指定port,不指定則會是預設值4646
- plugin “raw_exec”
- 似乎只有raw_exec要在client.hcl中註明載入
- 官方的exec (Isolated Fork/Exec): 只適用於Linux (可能是cgroup原故吧)
以command line方式nomad client
1 | nomad.exe agent -config="C:\nomad\conf\client.hcl" |
將 nomad server 及 client 安裝成 Windows Service
執行cmd (run as Administrator),執行sc.exe,如下
install nomad server
1 | sc.exe create "nomad-server" binPath="C:\nomad\nomad.exe agent -config=C:\nomad\server\conf\server.hcl" start=auto |
start nomad server
1 | sc.exe start "nomad-server" |
install nomad client
1 | sc.exe create "nomad-client" binPath="C:\nomad\nomad.exe agent -config=C:\nomad\client\conf\client.hcl" start=auto |
start nomad client
1 | sc.exe start "nomad-client" |
將服務托管成一個job
先準備一個描述jobspec的file,檔名為sample.nomad,以HCL語法撰寫。
在此展示托管nodejs之服務,內容如下:
1 | job "<job-name>" { |
完成後,可以先透過dry-run方式,幫你檢查語法有沒有錯誤。
1 | nomad job plan sample.nomad |
正式啟動job
1 | nomad job run sample.nomad |
刪除指定job
1 | nomad.exe job stop -purge <job name> |
其他注意事項
Service Mesh
nomad service mesh 必須以consul做為後端整合。
但僅適用於Linux環境。
Windows或macOS不適用。
Reference

